
🎓Tutorial: How to Download and Install n8n Locally

In this tutorial we are going to learn how to install n8n locally on our computers so we can use it without Internet access.
The first thing we are going to need is a program called Docker to run n8n in a container.
To install Docker we are going to rely on this video tutorial by the user @tutorialesit
Docker en Windows 11: Instalación Paso a Paso para Principiantes

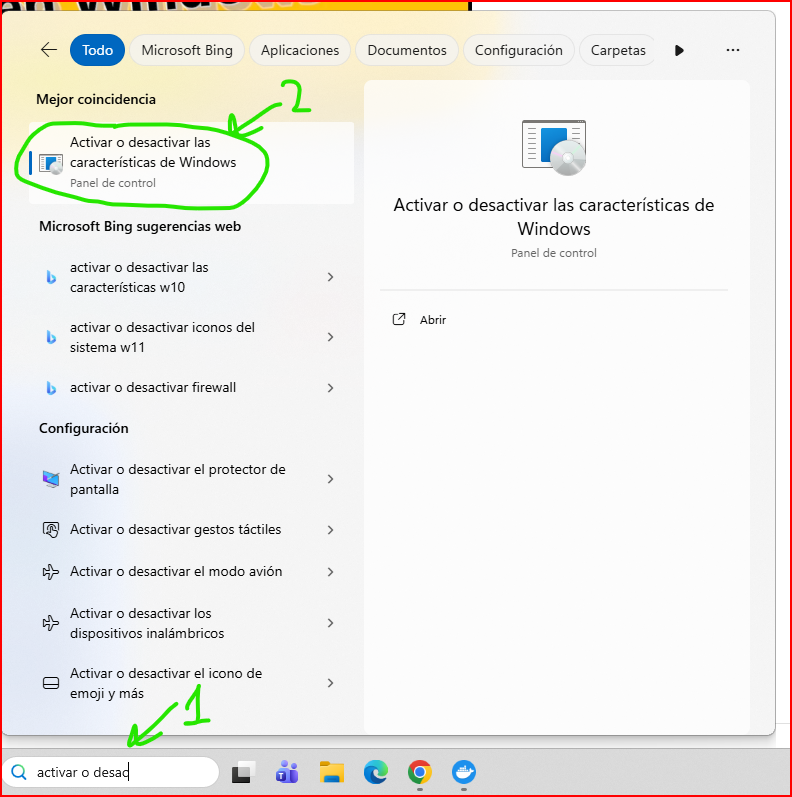
The first thing we are going to do is go to the taskbar search and search for "Turn Windows features on or off" and open it.
Once open, we check "Windows Subsystem for Linux" and click "OK".
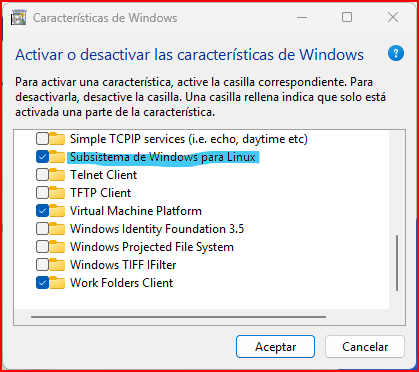
When we click OK it will apply the changes and it may ask us to restart the computer. If so, we restart the computer.
Once back, we must check whether virtualization is enabled. To do so, we press the keys ctrl+alt+del and open the task manager and in the task manager we go to Performance/CPU and check whether virtualization is enabled.
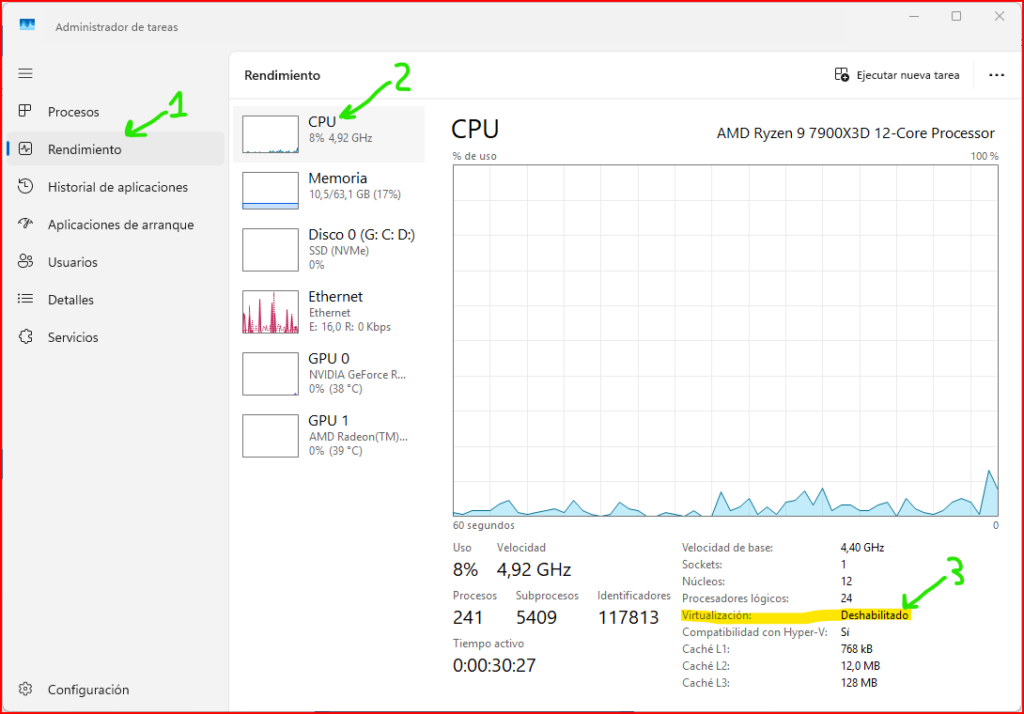
In my case Virtualization is disabled, so we are going to enable it. As my BIOS is a Gigabyte one, I entered the BIOS by restarting the PC and using the F12 key and once inside going to Advanced Mode/Tweaker/Advanced CPU Settings/SVM Mode/Enabled then "Save & Exit Setup" and clicking "YES"
Here is an explanatory video by the user @BestTechTeam
How to enable virtualization on Gigabyte bios - Quick and easy!

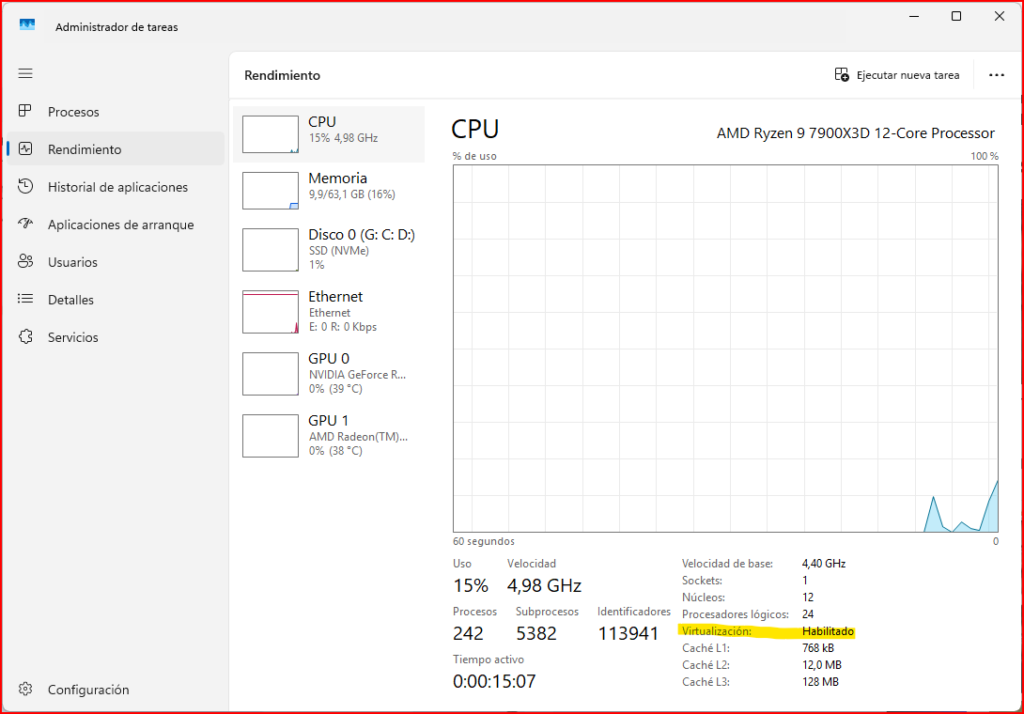
And as we can see, we now have virtualization enabled.
The next step is to download Docker.
We can download Docker from https://www.docker.com/products/docker-desktop/ by clicking the "Download Docker Desktop" button and selecting the version that suits us. In my case "Download for Windows - AMD64"
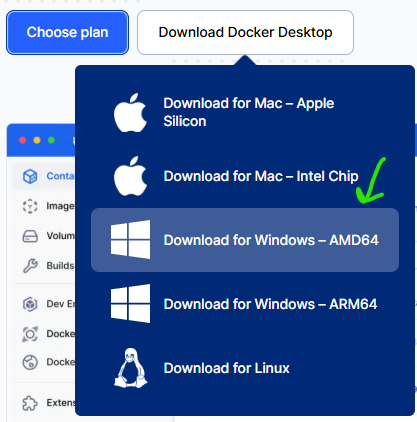
Once downloaded, just run the file and keep clicking next with the options checked by default and it will install; finally it will ask us to restart the computer.
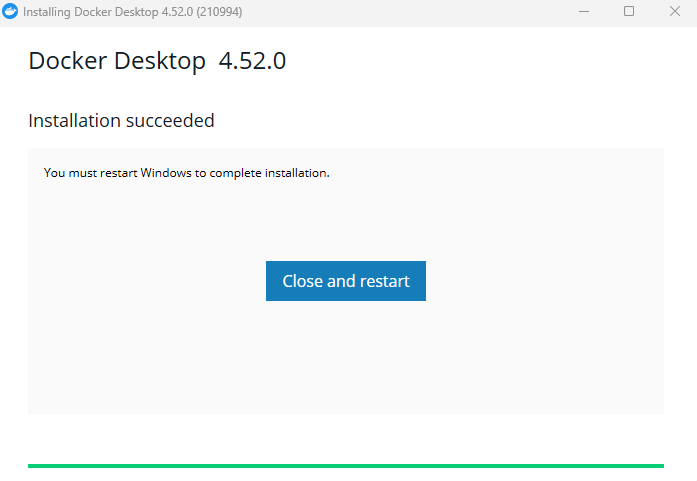
We close and save anything we are doing on the computer and click "Close and restart" to restart the computer.
Once we have restarted the computer, a Docker window will appear for us to accept the terms. We accept them by clicking "Accept"
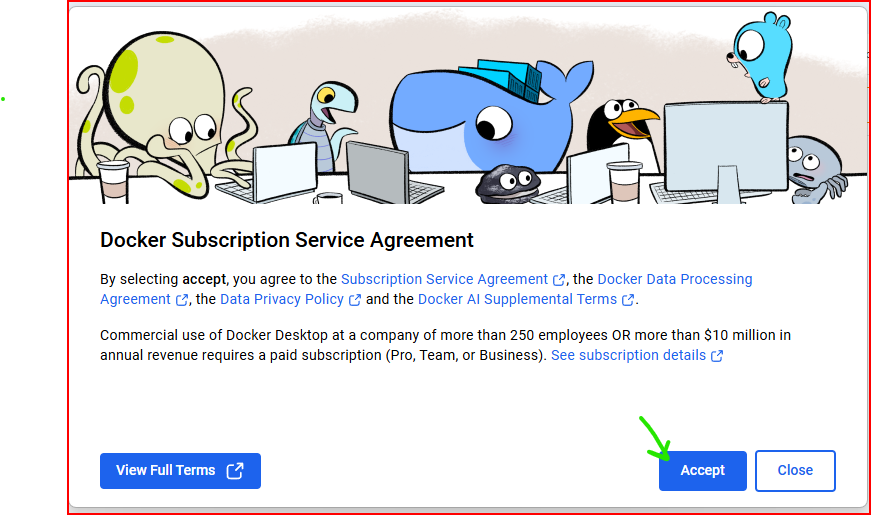
Once we click Accept it will ask us to enter an email address this is not necessary we simply click the "Skip" option and skip that step.
It is likely that after this step an error like the following will appear:
<<WSL needs updating
Your version of Windows Subsystem for Linux (WSL) is too old.
Run the command below to update or for more information, visit .the Microsoft WSL documentation>>
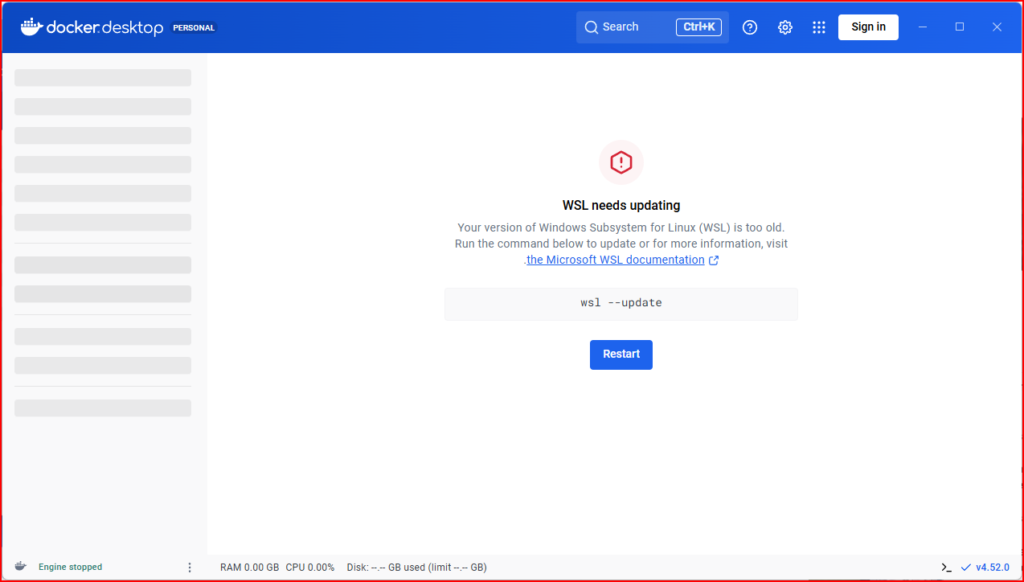
That means WSL is out of date. To update it, we open the console window that will have opened with the program to run a command that I will give below.
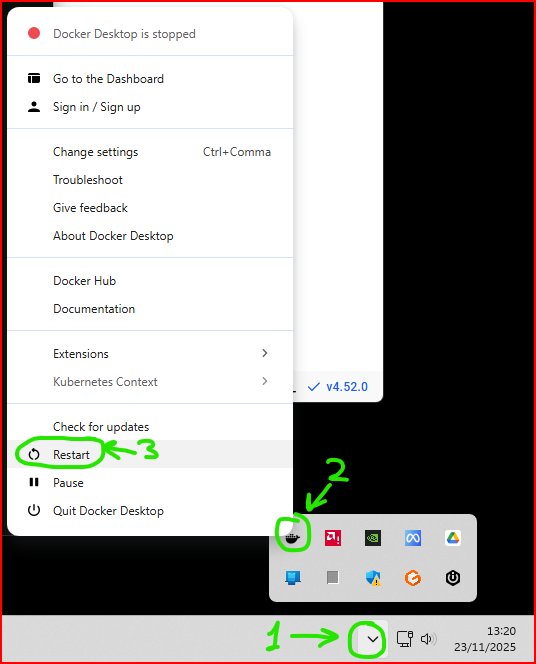
NOTE: it is likely that at this point the console window has closed, no problem, we can restart Docker as follows and it will open again:
A window like this will open
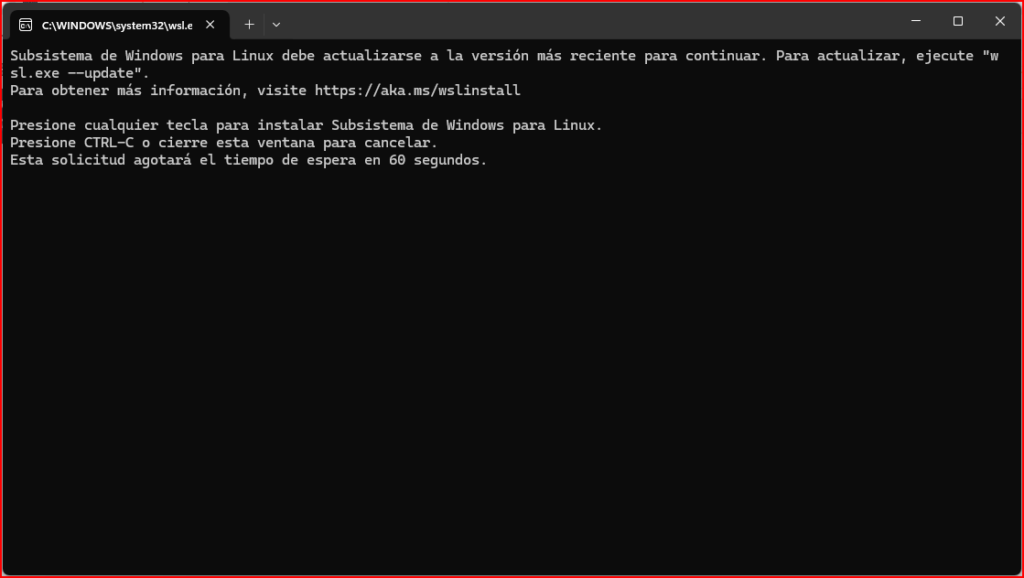
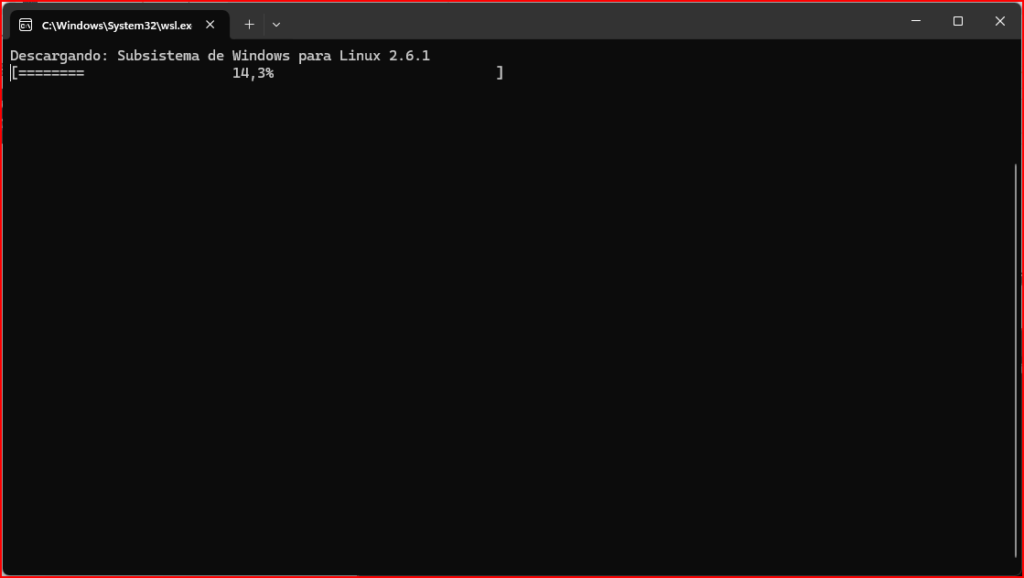
We click on the console and press any key (such as enter) and it will start updating as in the following example:
Once it has finished updating it will give us the option to close by pressing any key.
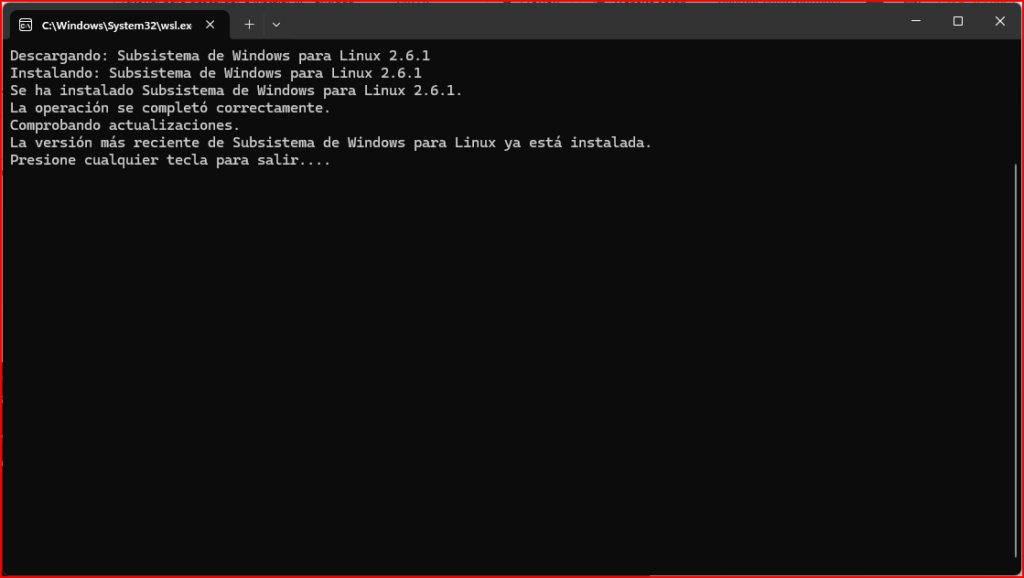
We press any key and close the window and then we close Docker completely as shown below:
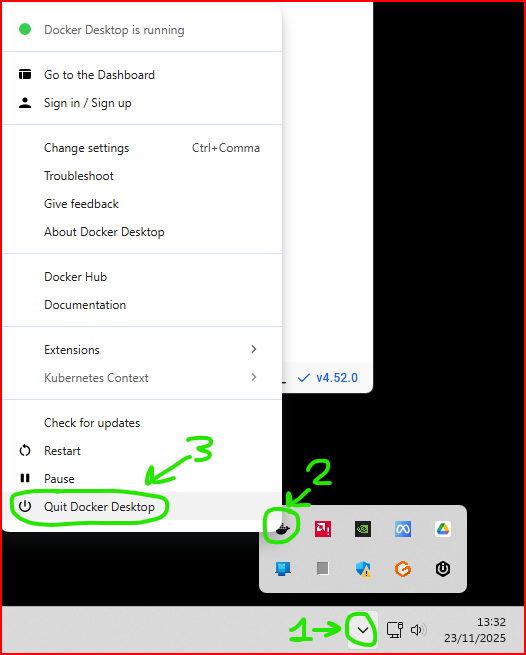
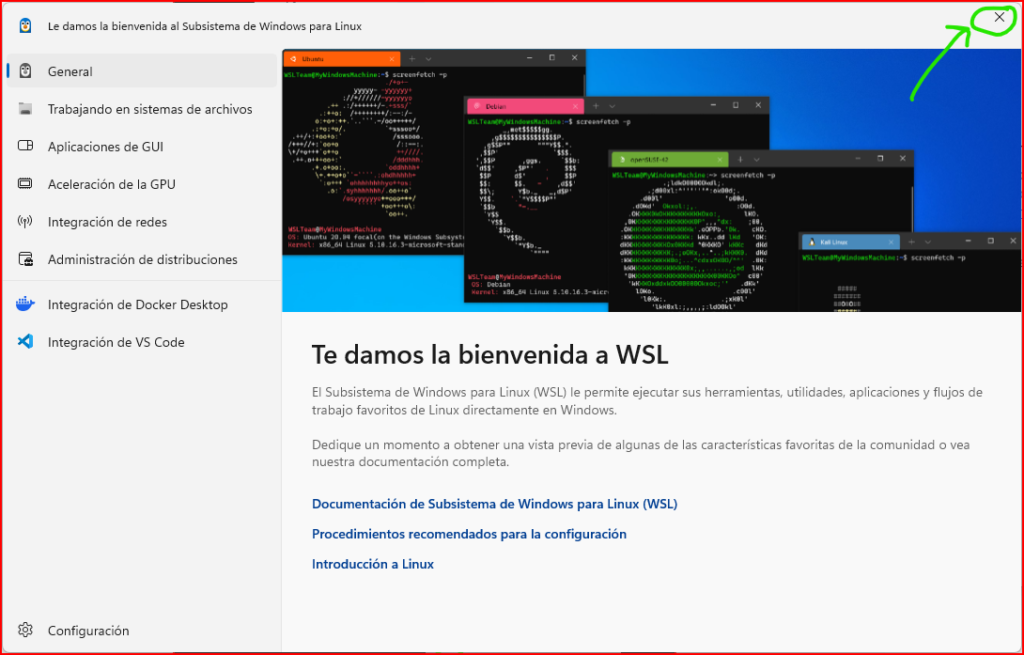
We open Docker again and a WSL welcome window will open. We simply close it:
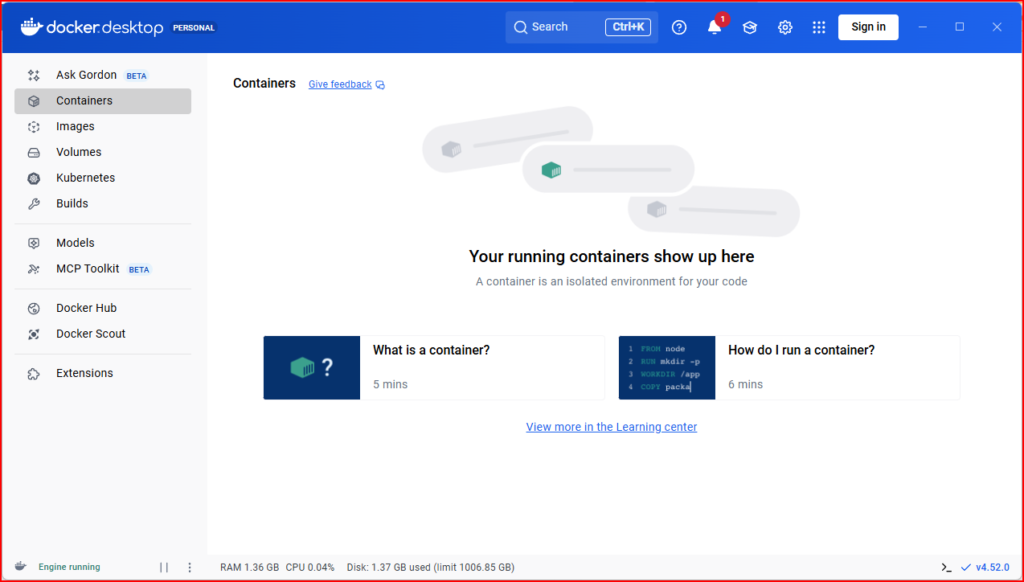
Having done this, Docker will now work normally as we see in the following example. We leave Docker open for the next step "Installing n8n"
Installing n8n
For this we are going to rely on the video tutorial by @RingaTech so that, in case you have any doubts, you can see in the video below exactly how it is done.
Utiliza n8n Con Modelos Locales (Privado y Gratuito!)

The first thing we do is create a folder called n8n on the hard drive so that the path looks like this "C:\n8n"
In my case, I am going to use a different path because I like to keep programs in a specific location; my path has ended up as follows "C:\Programas\n8n"
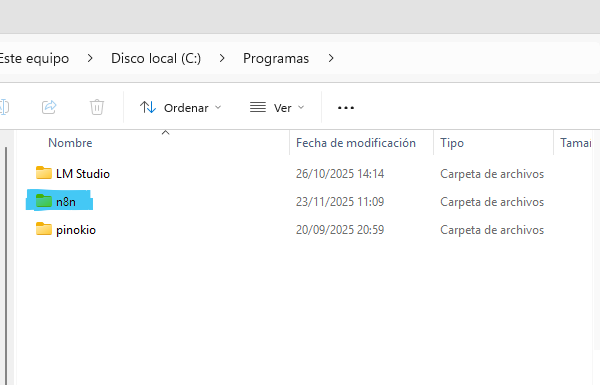
We enter the n8n folder
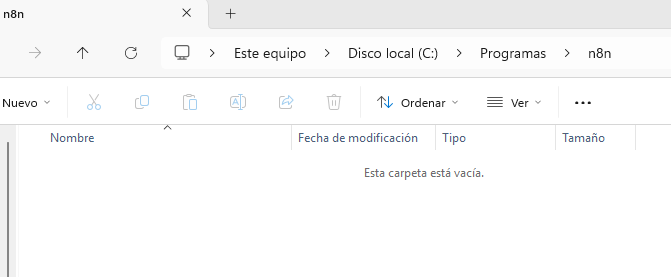
First we make sure Docker is open; if so, inside the n8n folder we type in the address bar "powershell" and press Enter.
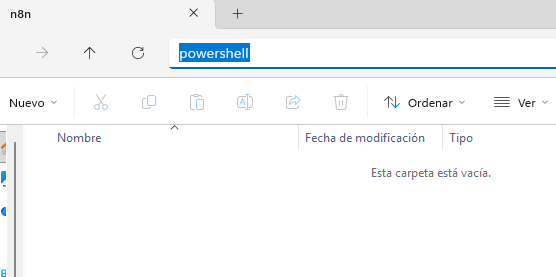
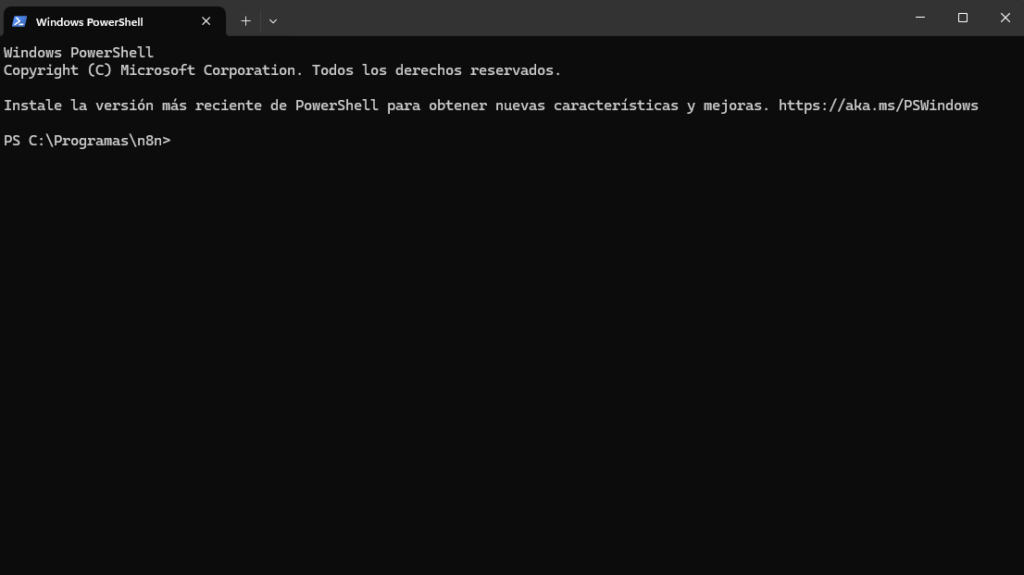
The PowerShell console will open at the path where our n8n folder is.
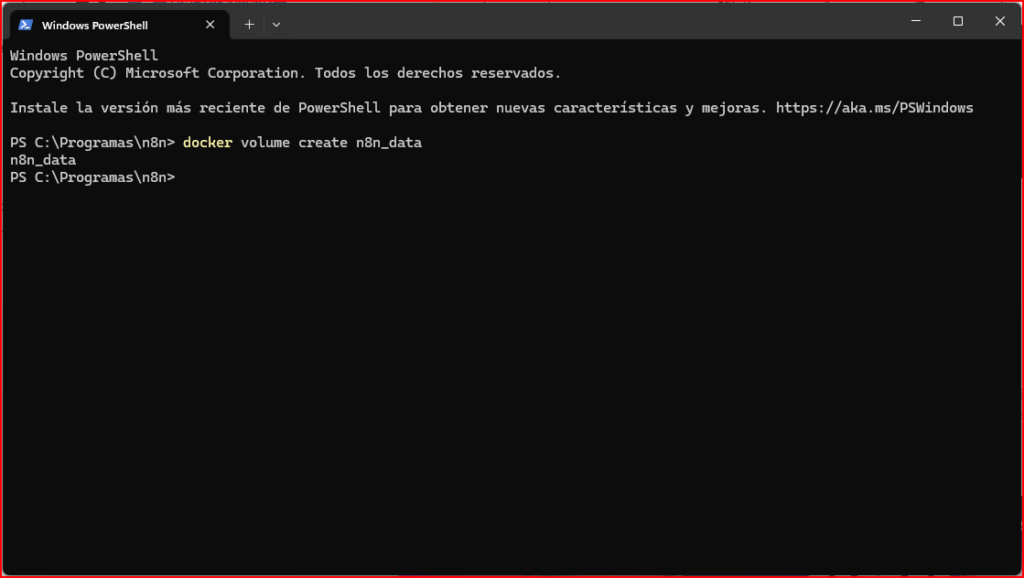
In the PowerShell console we will type the following:
docker volume create n8n_data
and press Enter.
This way we will have created the container.
Now we type the following in the console and press Enter:
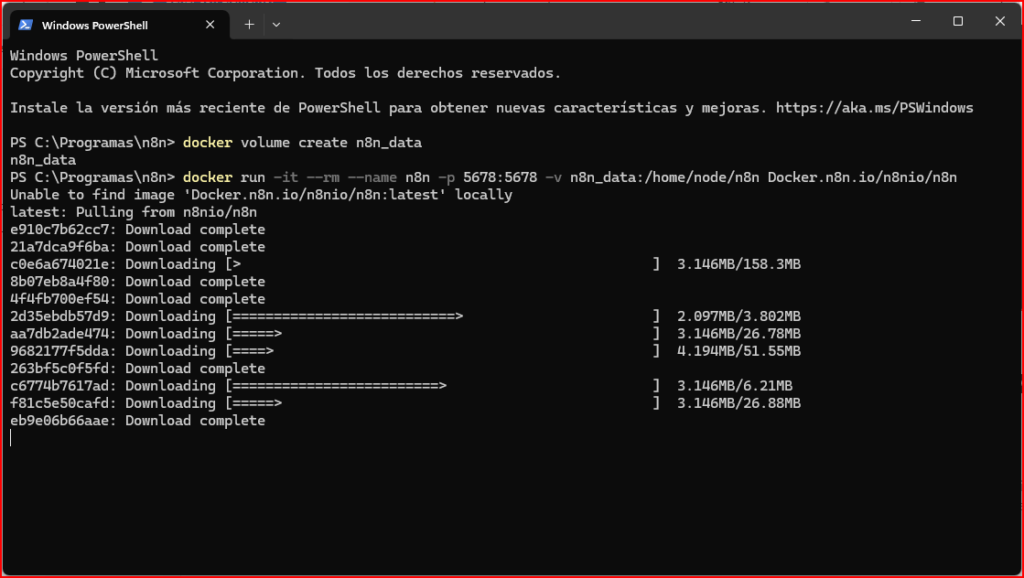
docker run -it --rm --name n8n -p 5678:5678 -v n8n_data:/home/node/n8n Docker.n8n.io/n8nio/n8n
At this point it will probably start downloading the Docker image, and you will see something similar to the following in the console:
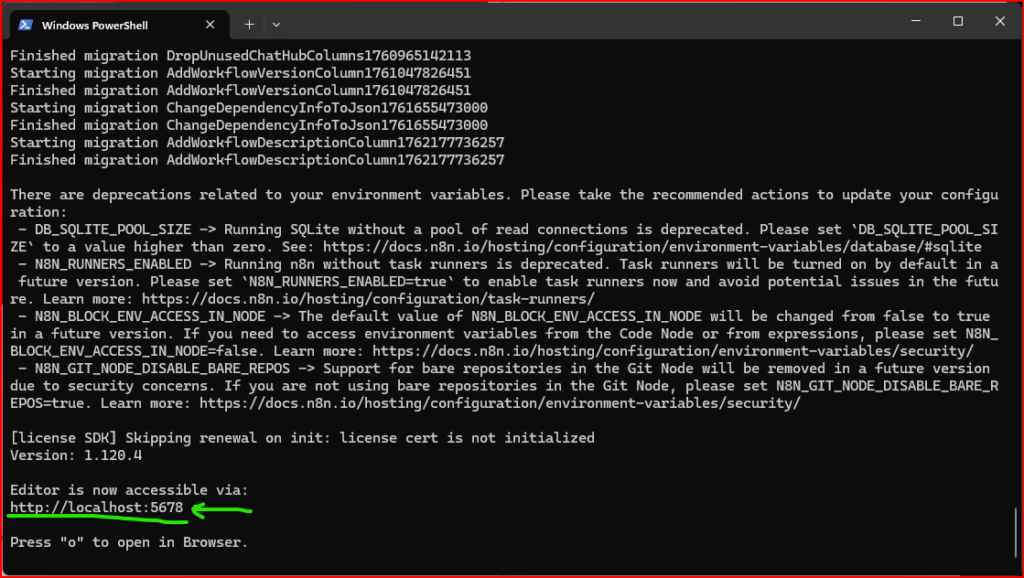
Once it has finished, a link to open n8n will appear; in my case it is "http://localhost:5678" as you can see in the image:
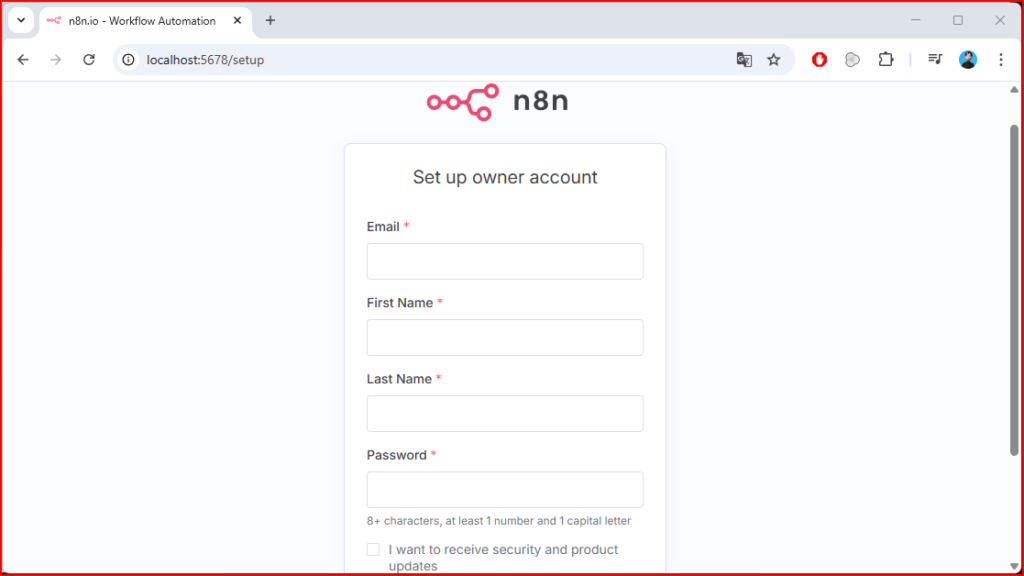
We open the link that appears in the browser and the n8n window will open, which means we already have n8n installed.
Next we have to close n8n by typing "cls" in the same console (if it does not let us, first ctrl+c and then type cls and enter)
For the next step we are going to need to create a file "compose.yml", in the video tutorial they create it with Visual Studio Code which is downloaded from https://code.visualstudio.com/
We install Visual Studio Code and open it, we click the icon of the two sheets and then Open Folder.
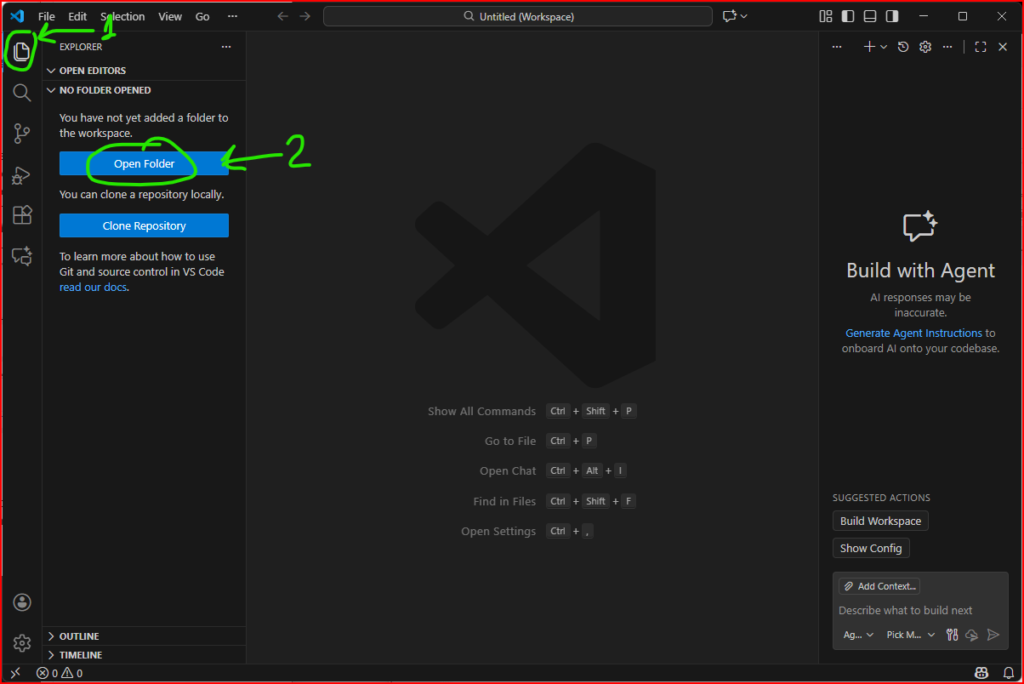
Once the directory is open in Visual Studio Code, we right-click and then "New File" and name the file "compose.yml"
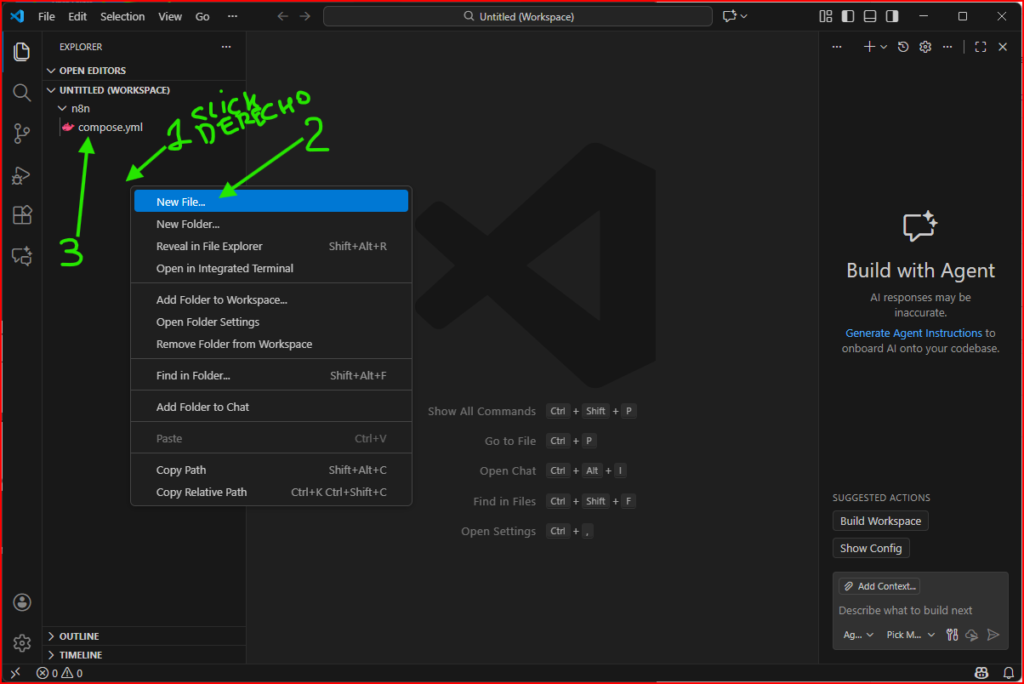
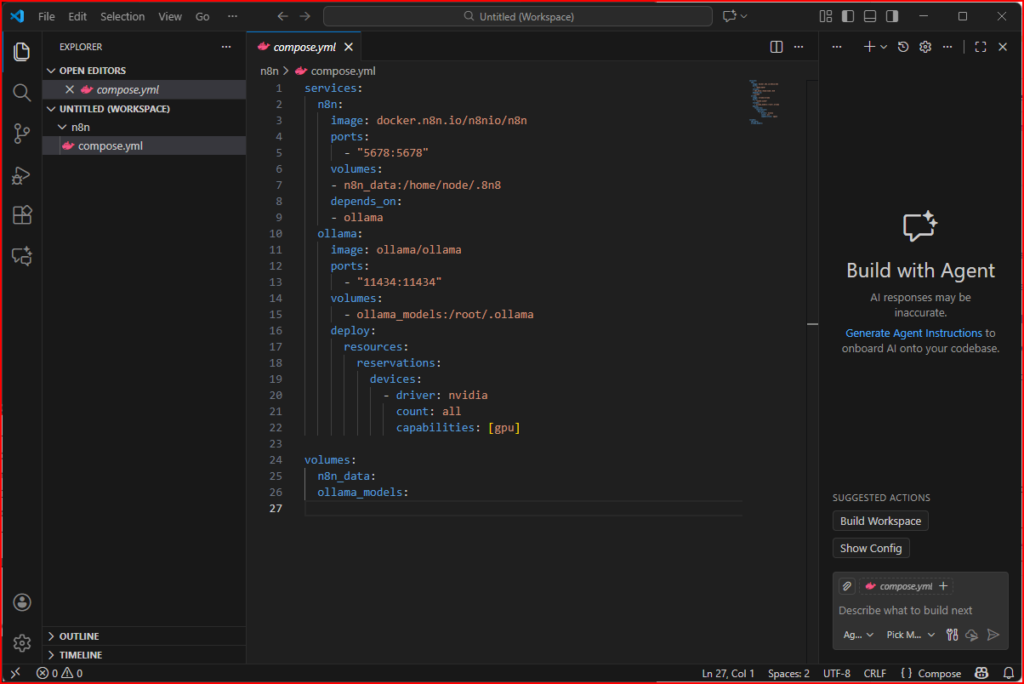
Now we must type exactly the following code, respecting the spaces (to "nest" one "command" inside another you must separate with two spaces). For this the most advisable thing is simply to copy and paste the following:
Docker compose exampledocker-compose.yml
services:
  n8n:
    image: docker.n8n.io/n8nio/n8n
    ports:
      - "5678:5678"
    volumes:
    - n8n_data:/home/node/.8n8
    depends_on:
    - ollama
  ollama:
    image: ollama/ollama
    ports:
      - "11434:11434"
    volumes:
      - ollama_models:/root/.ollama
    deploy:
      resources:
        reservations:
          devices:
            - driver: nvidia
              count: all
              capabilities: [gpu]

volumes:
  n8n_data:
  ollama_models:
If it has been entered correctly, it should look like the following.
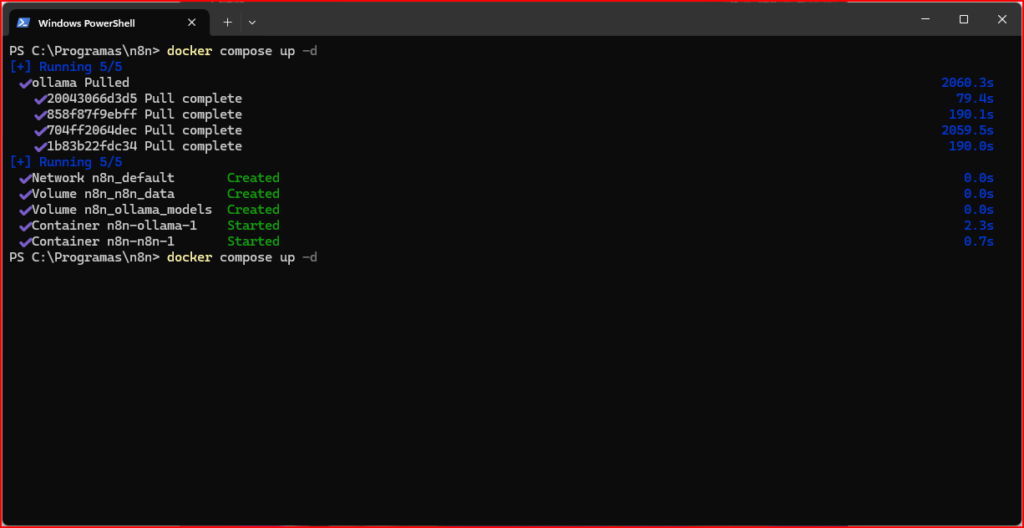
Now, inside that same folder (n8n folder) we run PowerShell by typing it in the address bar as we did in the previous steps and type the following:
docker compose up -d
It will start downloading the Ollama images to Docker and finally we will see something like this in the console:
Now we type the following:
docker compose logs --follow
And we will get something like the following, where the URL we must connect to will appear:
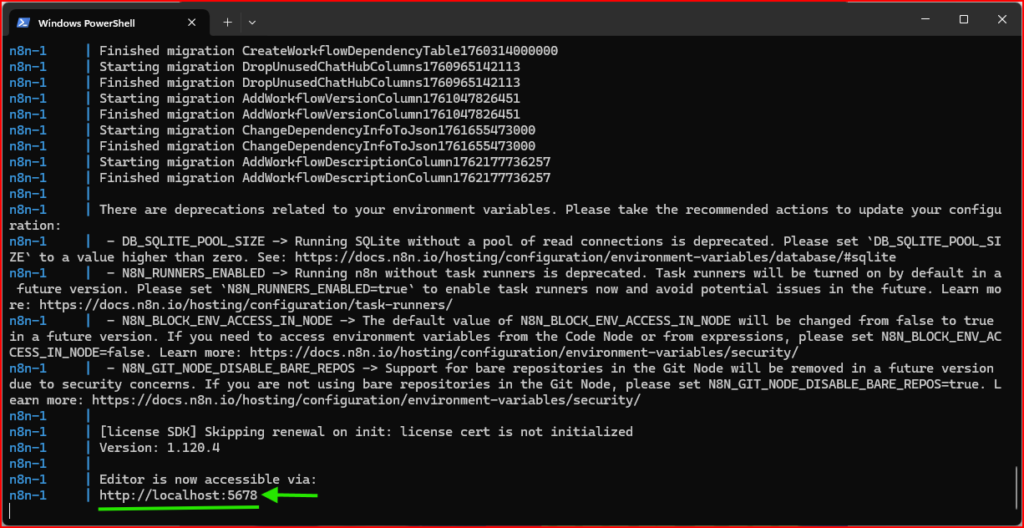
When we open the URL we will see n8n again.
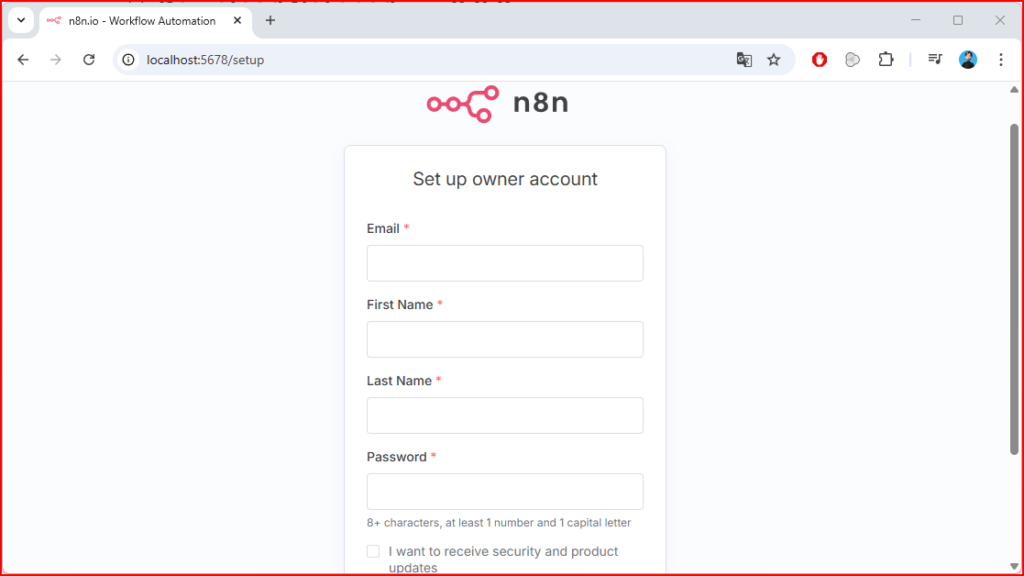
In fact, if we go to Docker we can see it running. Although this is only to check that it is running, you do not need to do this step, you would see the following:
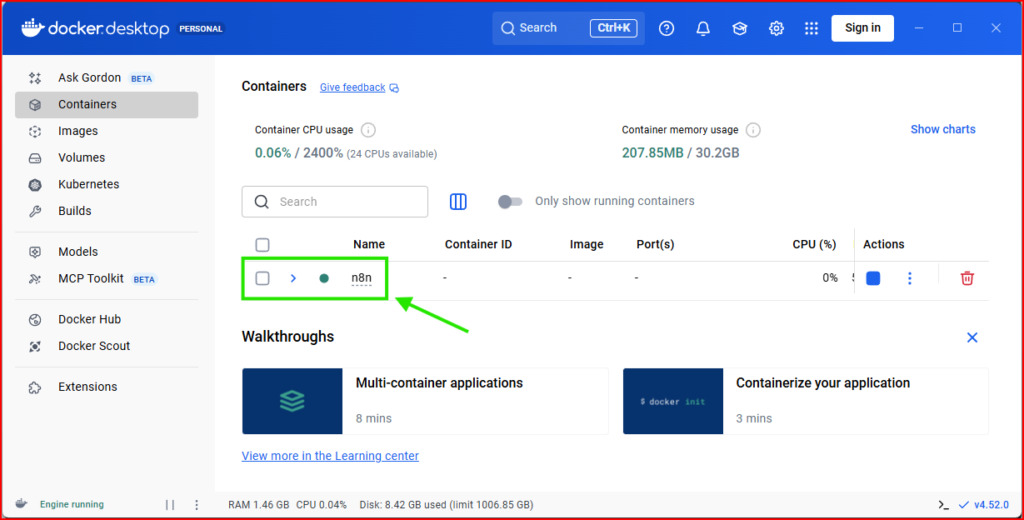
Going back to n8n, set up your access details, this is to register, and we click Next. Example:
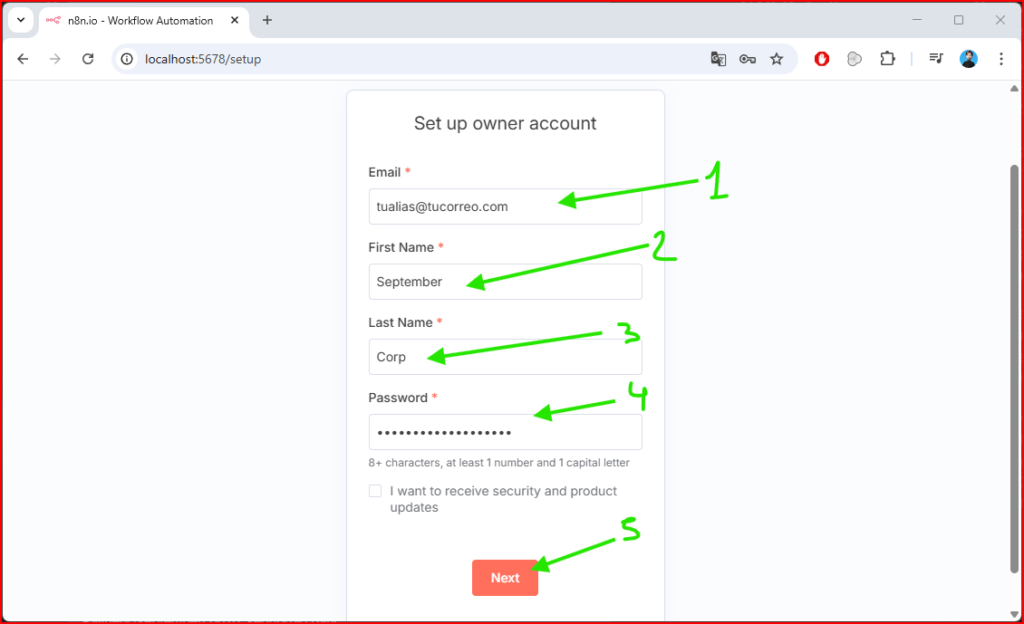
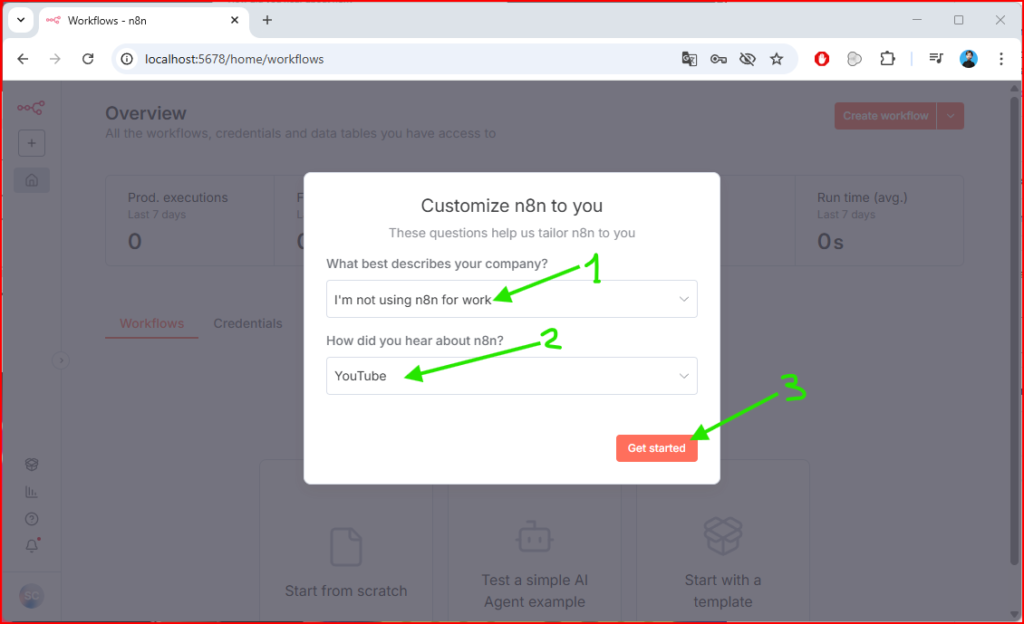
Next it will ask you a series of things; fill them in with what corresponds to you and click Get started.
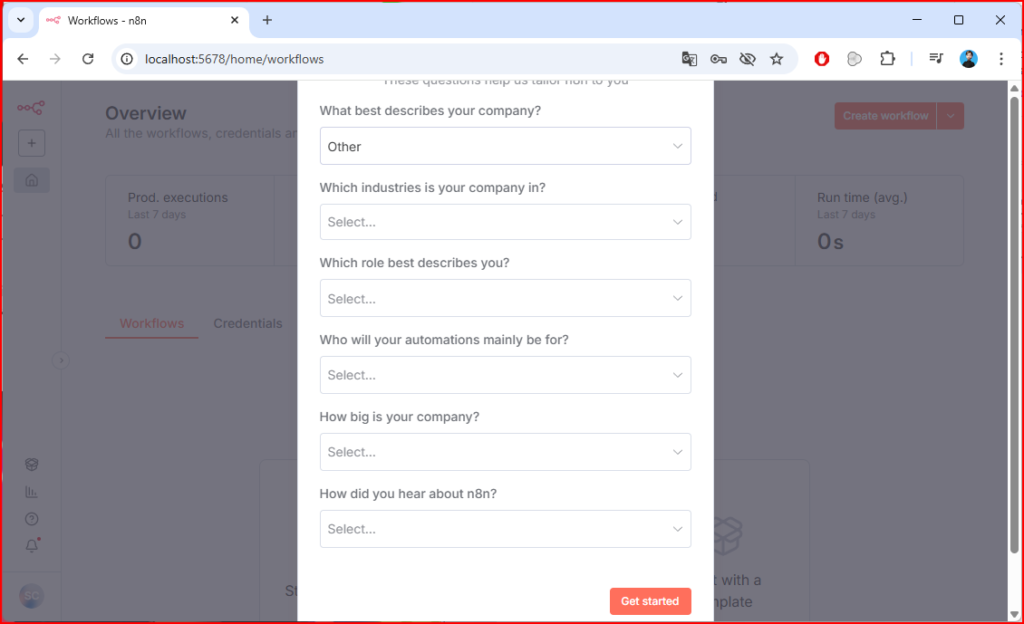
In my case, as I do not plan to use it for work, I will put exactly that. Example:
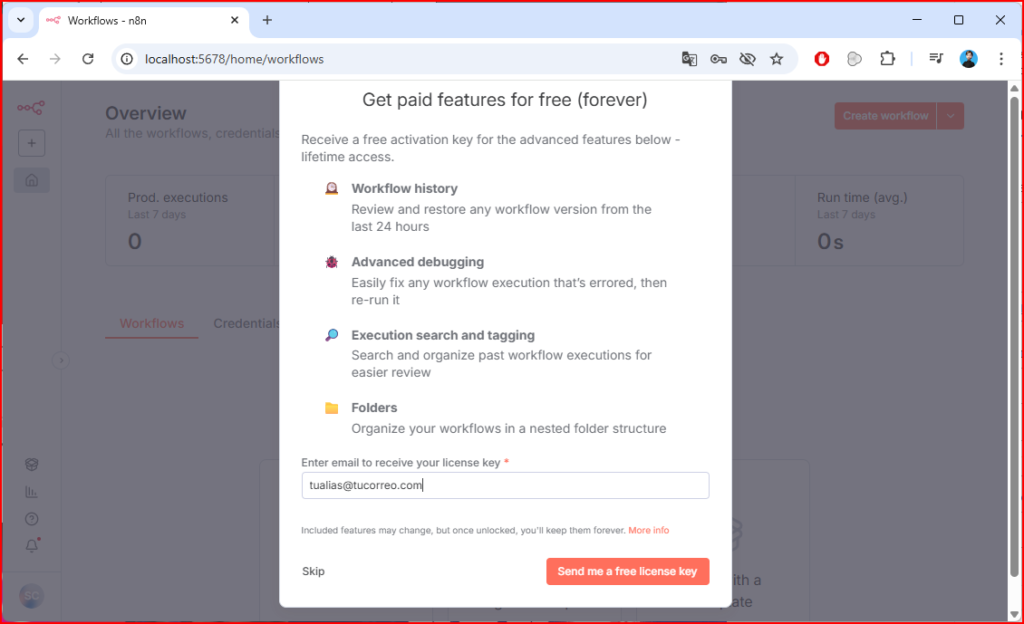
Now it will tell you that if you enter your email it will send you a lifetime activation key. Enter your email, I will enter mine, after all... It's free! and we click "Send me a free license key"
Having done this, we will receive an email with the license key and a link to activate it. You will have something similar to the following image, although in your case the license key will be visible; I have covered it in the example because it is my license key.
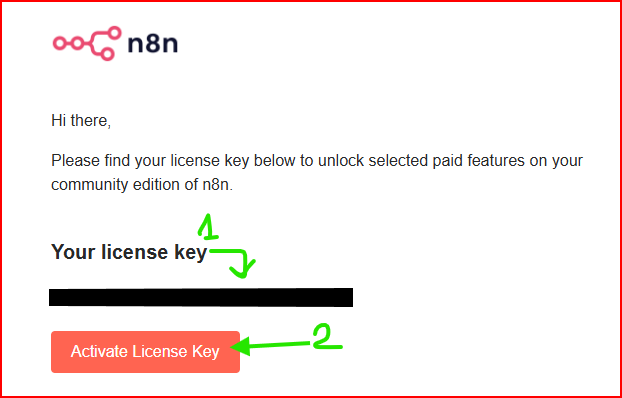
Once we click "Activate License Key" a window will open where briefly a pop-up will appear saying that it has already been activated.
Now, after so many headaches, we can start using n8n.
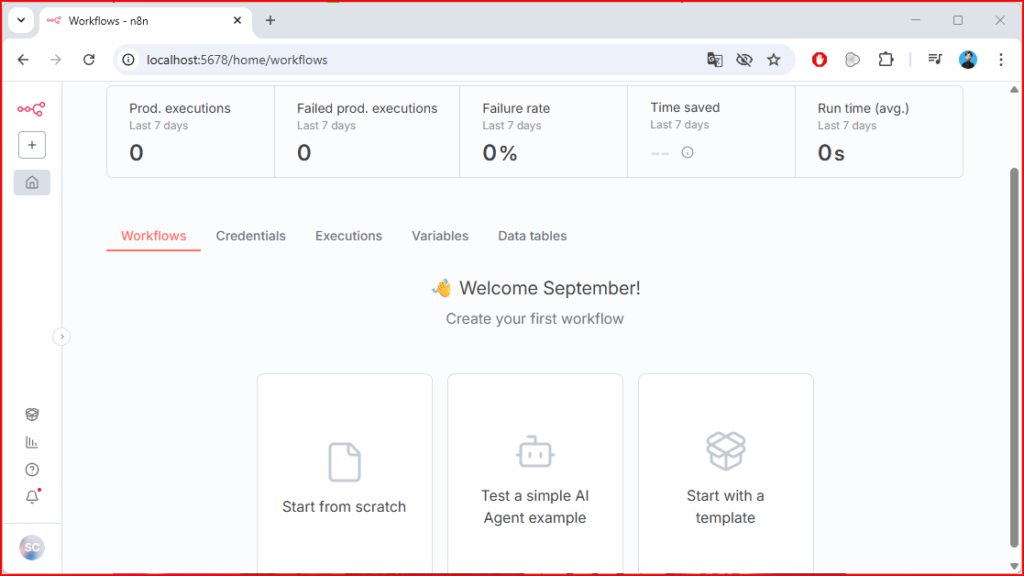
The way to start using it is simply to click "Start from scratch" and we could already start creating our workflows.
Let's test that everything works.
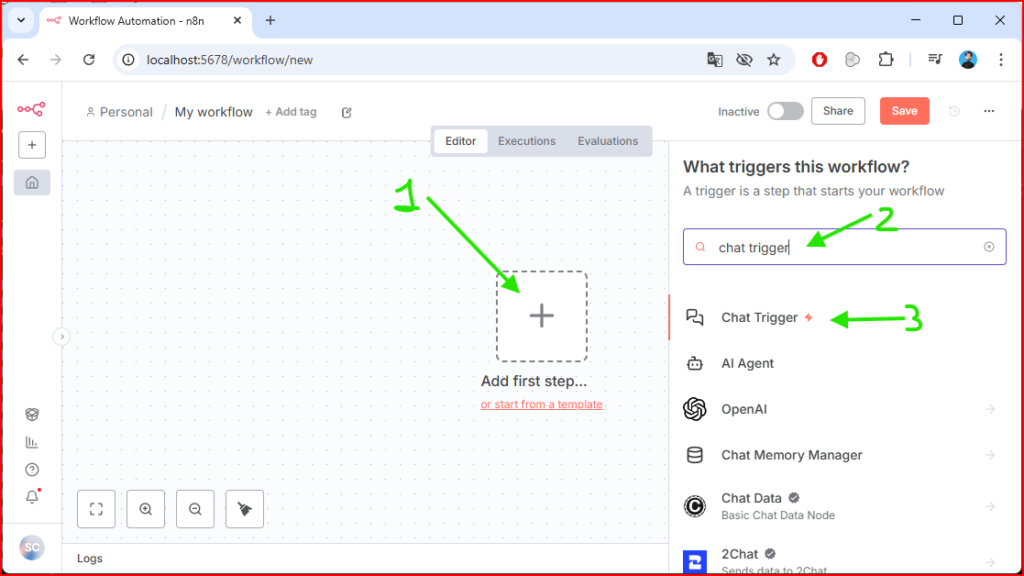
First we click Start from scratch and the work environment will open where we must click "Add first step..." search for chat trigger and click on chat trigger.
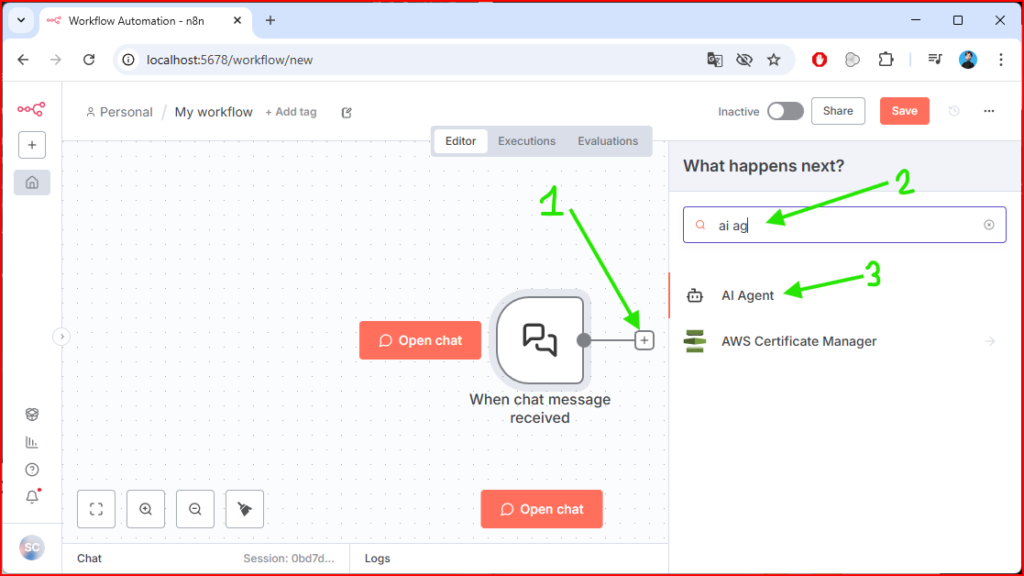
A window may open; we click outside it and it will close and we will have the chat trigger in our workflow under the name "When chat message received" we click the symbol "+" to add an AI agent.
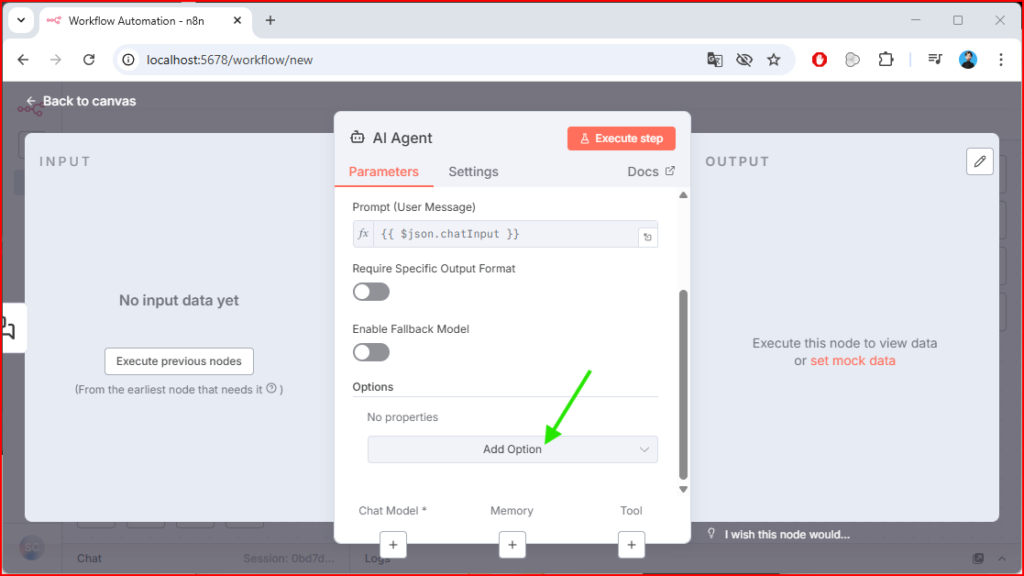
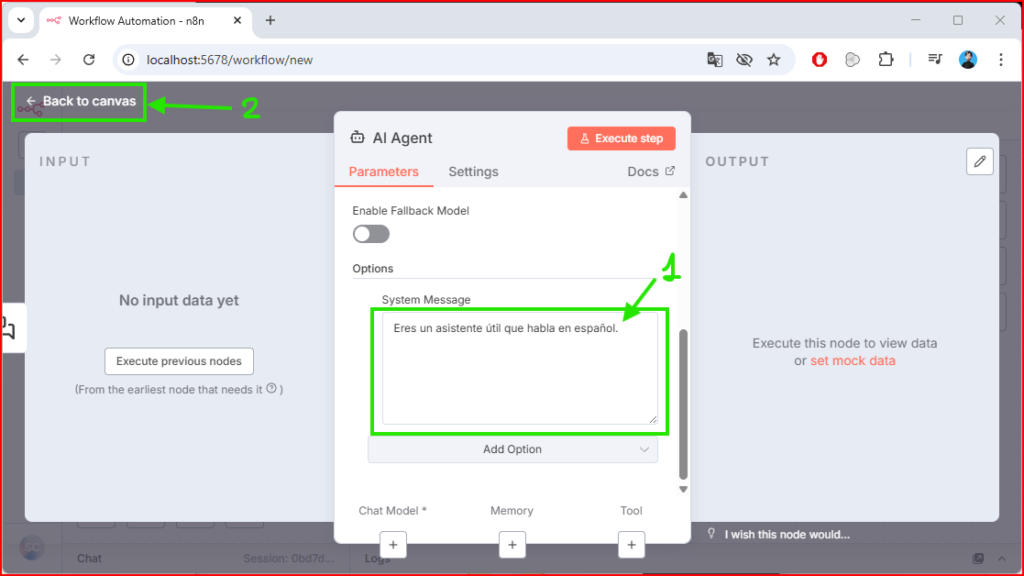
We click on Add Option
Then on System Message
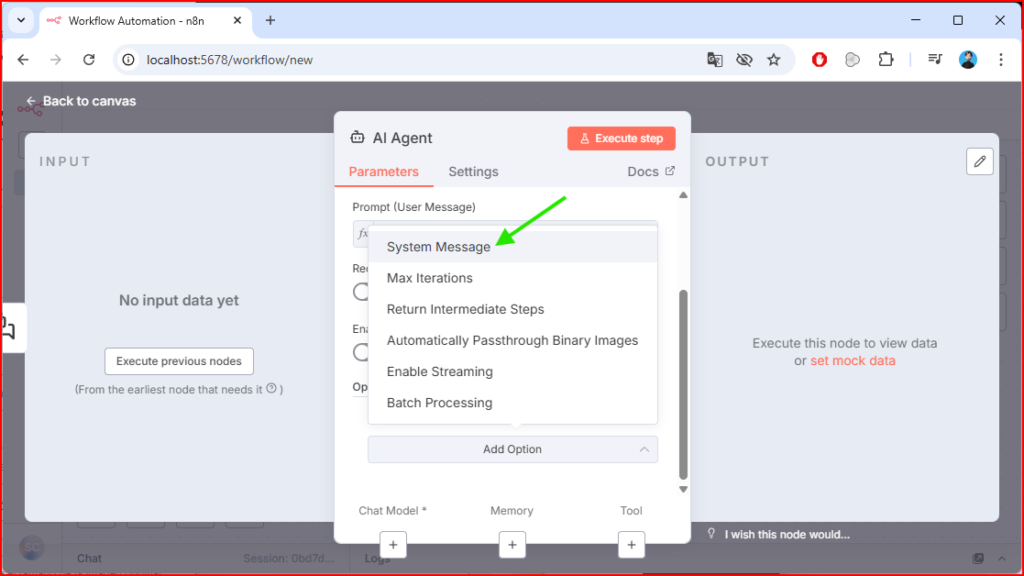
We write our instructions for the AI agent in the field System Message. In my case I have written "You are a helpful assistant who speaks Spanish" so that it answers me in Spanish.
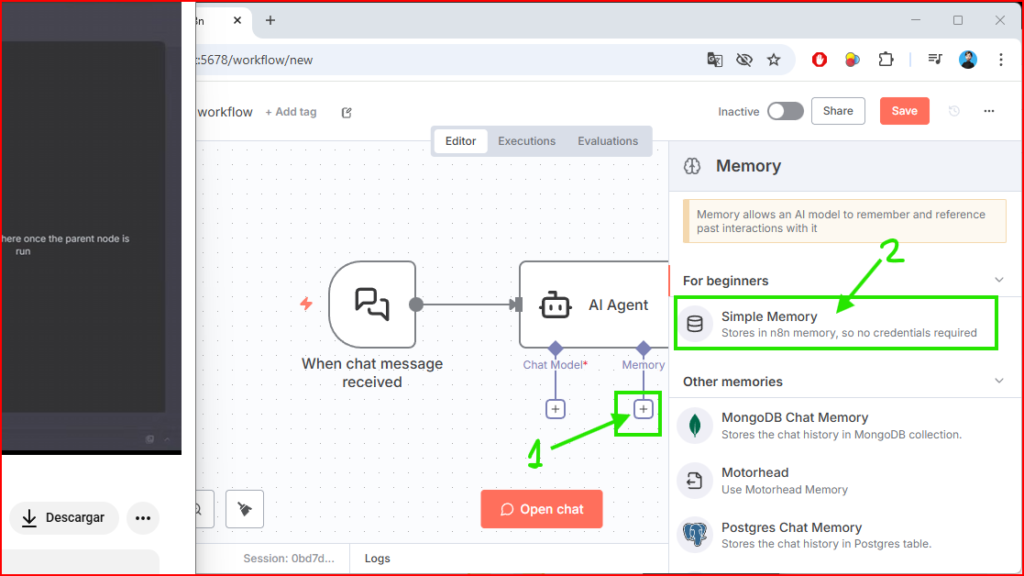
Now we add a memory so it can remember some things. To do so we click the symbol + on Memory and then we select Simple Memory:
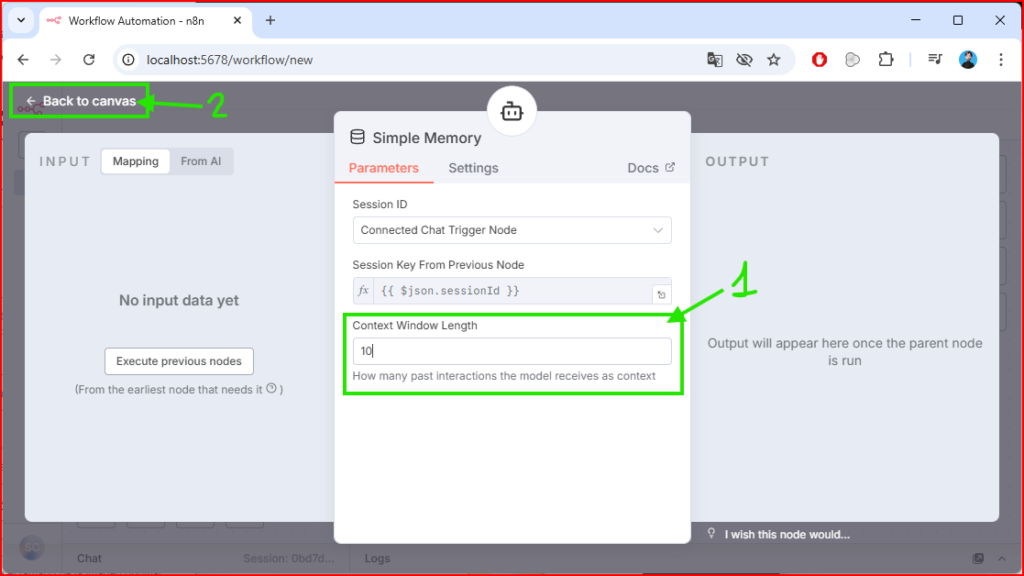
We have to add a context; the larger the context, the more it will remember but the more tokens (resources) it will need to generate its answers. We add a context of, for example, 10.
Now we add the Ollama model.
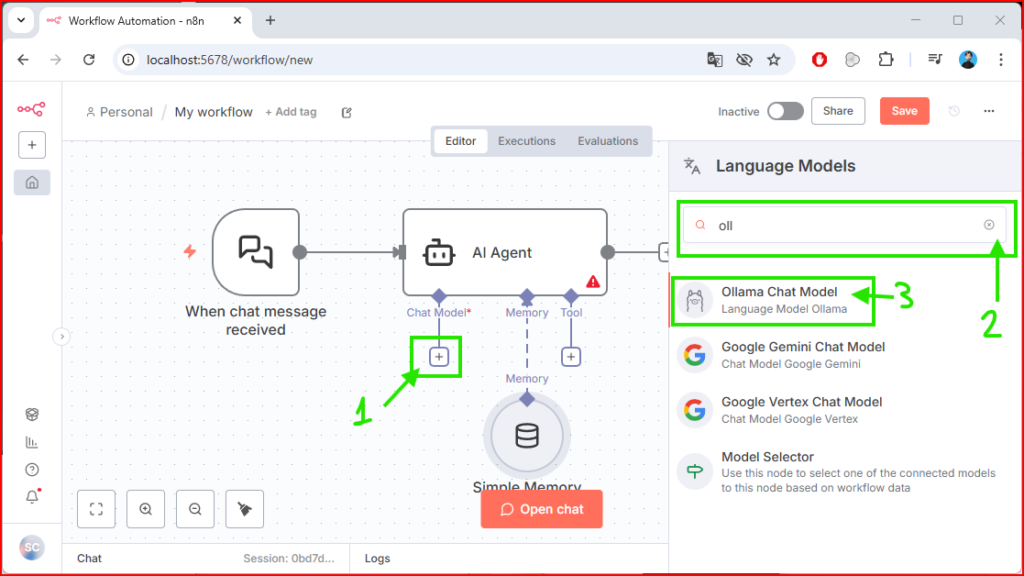
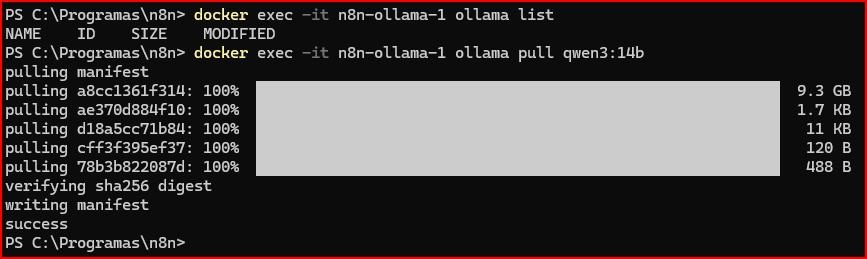
However, we do not have the Ollama model downloaded; to download it we go to the n8n folder, open PowerShell and use the following commands:
docker exec -it n8n-ollama-1 ollama list
That command will give us a list of the installed models; since there is no model installed, nothing will appear.
The next command is to download the Ollama model. In my case I will download the qwen3:14b model because my computer can support it.
docker exec -it n8n-ollama-1 ollama pull qwen3:14b
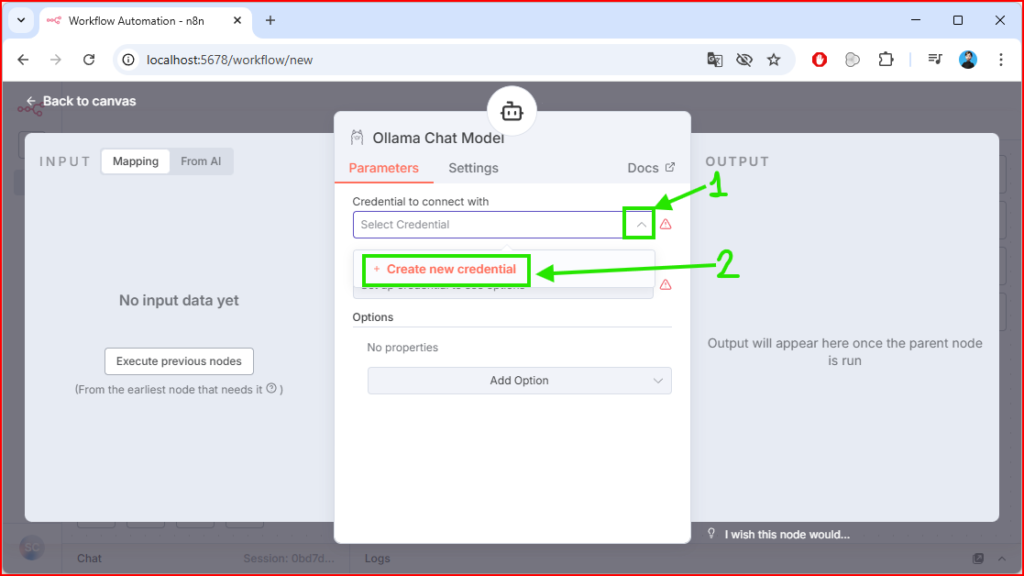
Once downloaded we go back to n8n and click "Create new credential"
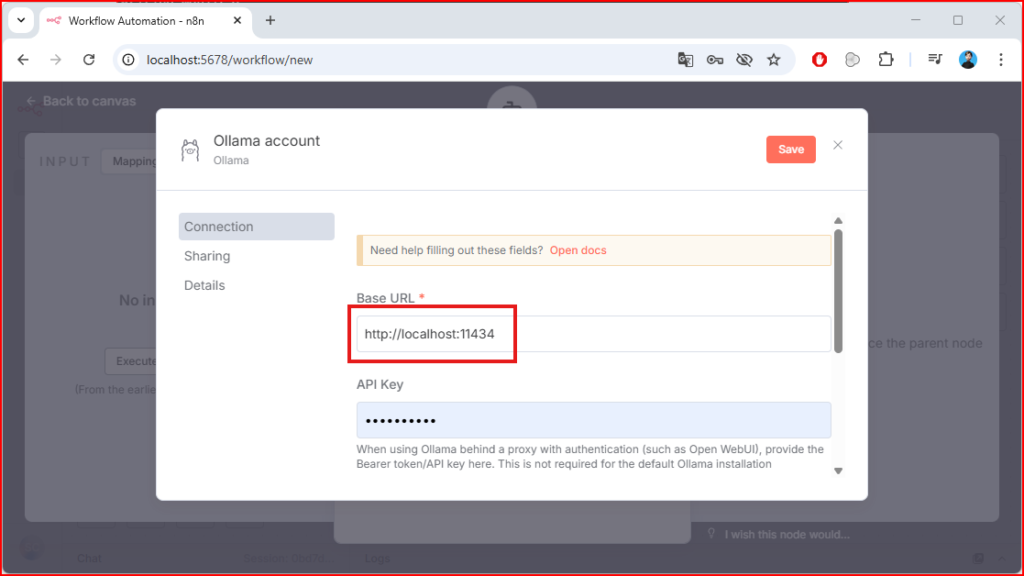
A window will appear in which we have to change the base URL.
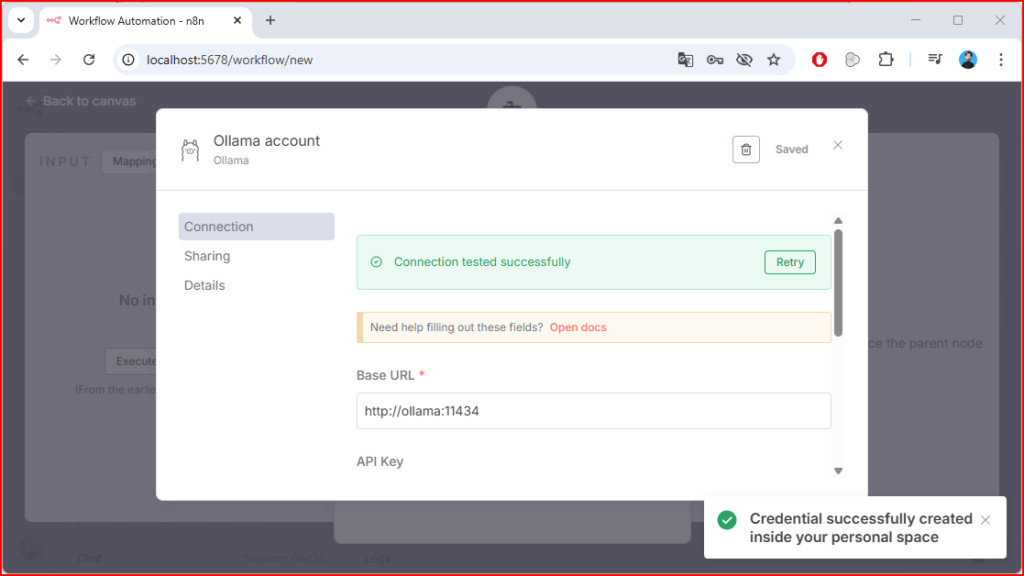
We change that Base URL to http://ollama:11434 and click "Save"
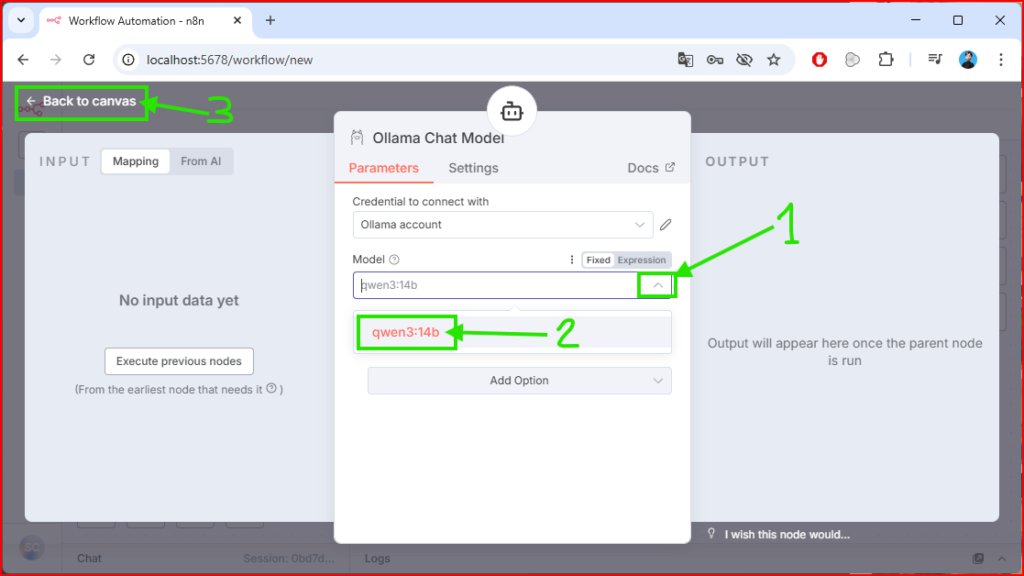
Now we select the model that we have downloaded, in my case Qwen3:14b
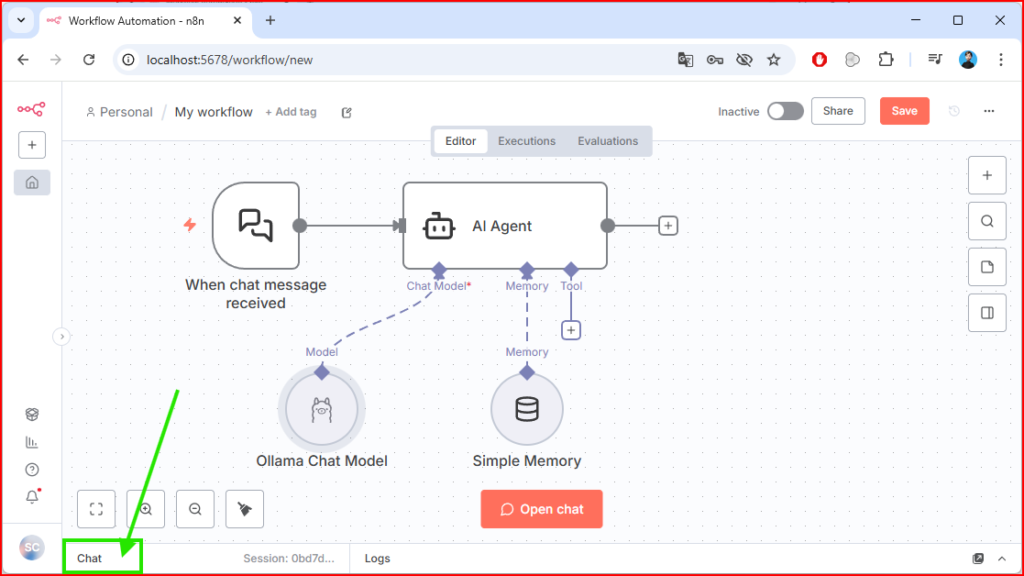
To test whether it works, we open the chat:
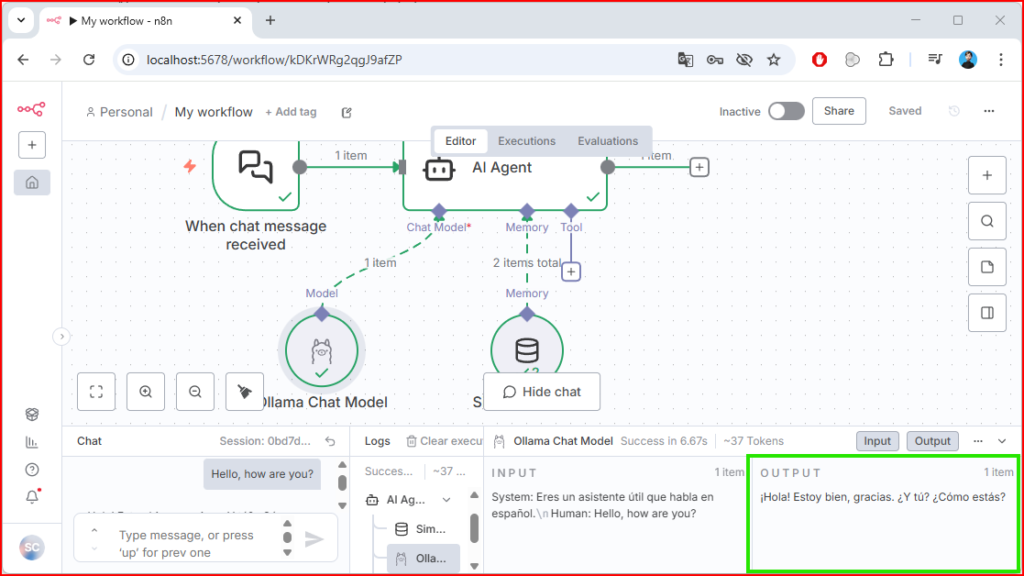
And we type anything; in my case I will greet in English to see whether it answers in Spanish (since I previously configured it as an assistant that speaks Spanish)
And as we can see in the following image, it answers me in Spanish perfectly.
With this we can verify that n8n is installed and works correctly on our computers.


Comments
No comments yet. Be the first!
Sign in to comment Create account